How to Set up a Zebra Printer
How to set up a Zebra GX420d printer and print tickets
Hardware Recommendation
Using a GC420d or ZD420 Zebra printer with Check-In allows you to use either Chrome or Firefox for your browser. To learn how to connect your Zebra ZQ 510 or ZD 420 to a mobile device through the Check-In app, check out this article.
Installing the Zebra Driver
Zebra only allows drivers to be installed when using a Windows machine. A brand new Zebra printer should have the appropriate drivers and you may be able to skip this step. However, if you run into an issue with printing, it may need updated drivers.
Here are the links to Zebra's Support page to download the printer driver.
Installing QZ Tray
Download and install QZ Tray from QZ Tray's website.
Run QZ Tray and click on QZ Tray from your toolbar.
Make sure ‘Start Automatically’ is checked.
Setting up the Zebra Printer
Turn on the Zebra printer and connect the printer to your computer using the provided USB cord.
Open Printers & Scanners on your Windows machine.
The printer should be auto-detected within your Printers & Scanners.
Rename the printer as desired.
Set the Zebra printer as the default printer.
Connecting the Zebra printer to Check-In
Open Check-In, choose a setup and select Zebra / GoDex from the list.
When running Check-In for the first time you should receive the below pop-up message from QZ Tray. Select ‘Remember this decision’ within the pop-up window.

Tip: If you do not receive the pop-up message, make sure your pop-up blocker is disabled and re-launch Check-In.
Select your printer from the list and continue to Check-In.

Setting up Zebra on Mac
Installing QZ Tray
Download and install QZ Tray from QZ Tray's Website.
Run QZ Tray and click on QZ Tray from your toolbar.
Make sure ‘Start Automatically’ is checked.

Setting up the Zebra Printer
Zebra does not support Mac OS, but you can still operate Check-In on a Mac after installing CUPS.
Plug in the Zebra printer and connect the printer to your computer with the provided USB cord.
Enable CUPS on your Mac
Open the Utilities folder in Applications and open the Terminal.
Copy and paste the following and then press return: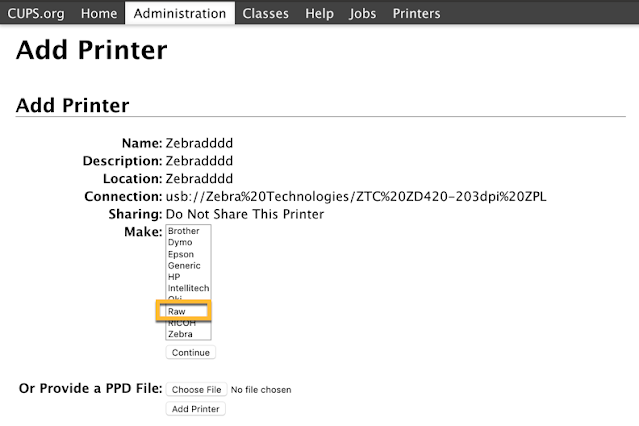
sudo cupsctl
		WebInterface=yes
Enter your password if prompted.
Open a browser window and go to http://localhost:631/ and select the Administration tab, then Add Printer.
Enter the Administrative password if prompted.
Select AppSocket/HP JetDirect and then select Continue.
Open the Terminal back up and paste
lpinfo -v | grep usbPress Return and this may run for a few seconds.
Copy the information from usb://Zebra to the ? as indicated below.
Paste this information into the Connection box in the CUPS interface and replace any information already present and then continue.
Enter a name for your printer, description, location and uncheck ‘Share This Printer’ and then click Continue.
Select Raw Queue from the list and then Add Printer.
Select none for both Starting Banner and Ending Banner and then click Set Default Options.
You should then receive a notice that the defaults have been set successfully.
Connecting the Zebra printer to Check-In
Open Check-In, choose a setup and select Zebra / GoDex from the list.
When running Check-In for the first time you should receive the below pop-up message from QZ Tray. Select ‘Remember this decision’ within the pop-up window.
Tip: If you do not receive the pop-up message, make sure your pop-up blocker is disabled and re-launch Check-In.
Select your printer from the list and continue to Check-In.
Troubleshooting
QZ Tray isn’t Working
If you are using Firefox and you do not receive the pop-up to verify QZ Tray, complete the following steps:
Open a browser tab and go to https://localhost:8181.
Add the exception.
Refresh Check-In.
Updating Zebra Printer Drivers (ON A WINDOWS MACHINE ONLY)
Download the Zebra Designer Driver and install.
At the additional install options screen, clear the ‘Launch installation of Zebra Font Downloader Setup Wizard’ and ‘Launch installation of Zebra Status Monitor Setup Wizard’ checkboxes and click Finish.
My Zebra Printer is Printing Blank Labels
If you are receiving approximately 4 blank labels during printing, the printer needs to be re-calibrated. Calibrating your Zebra printer can be accomplished through the Check-In app.
Open the Check-In app and connect to your Zebra printer.
Click on the Gear icon and click Calibrate.
This should re-calibrate your Zebra printer to the labels.
When I Print, One Label comes out, then 2 Blank Ones, and Then the Light Flashes Red
This happens when you are using black mark labels. Black mark labels have black lines on the back side of the labels. We do not support these labels. Replace the labels with normal direct thermal 3 inch wide by 2 inch high labels, like these ones from our Preferred Service Providers or these ones from Amazon.com. If the light on the front of the printer is now flashing, press it once. Check out this article for how to calibrate your Zebra printer.
My Labels Keep Retracting into the Printer and Calibrating it Doesn't Fix It
This happens when you select that your printer has a cutter in the Check-In printer setup, but your printer does not have one installed. Cutters for the Zebra GX 420 and ZD 420 are additional pieces of equipment that can be purchased separately and then installed. To correct this, follow these instructions on managing your printer settings.
Additional Zebra Resources
Check out these additional resources for further help.
Contact Zebra Support
If there is an issue with the printer itself or communication issues from the computer to the printer, then the best place to get support is from the printer manufacturer. Please contact Zebra Support at 1-877-275-9327 and have the serial number of the printer ready.