
How to Advanced Network Configure settings in Debian 11

Network Configuration in Debian 11
Overview
In this tutorial, you will learn how to configure network in Debian to use static IP addresses and DHCP. You will also learn how to configure the DNS name servers, Gateways, and subnets.
This tutorial covers the following versions of Debian:
- Debian 8 Jessie
- Debian 9 Stretch
- Debian 10 Buster
- Debian 11
View current network configuration
To view current network configurations, run the following command in Terminal. It will show the output for each interface in a separate section.
$ ip a

You can also run ifconfig command to view the IP address.
Network Interfaces Files
Debian’s network interfaces can be configured in two places. The primary location for network configurations is in the /etc/networks/interfaces file.
The second location for network configurations is under /etc/networks/interfaces.d, where you can drop network config files rather than storing everything in the interfaces file.
The /etc/networks/interfaces file looks like the following.
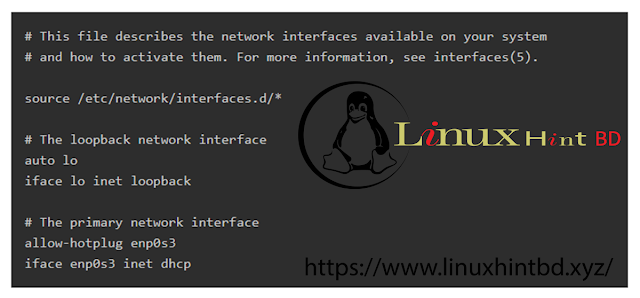
The first thing the interfaces file does it load additional configuration files from /etc/network/interfaces.d, if any files are stored there. It then proceeds to load network configurations from defined below that line.
Setting a Static IP address
To set a static IP address for an interface named enp0s3, you would write the following configuration.

The configuration above does the following:
- static sets the interface as static
- address sets the IP address to 192.168.1.2 and its subnet using CIDR /24, or subnet 255.255.255.0.
- gateway sets the network gateway IP address for routing traffic outside of the interface’s subnet.
This configuration can be added to the interfaces file or written to a configuration file under /etc/network/interfaces.d.
For example, the file could be saved as /etc/network/interfaces.d/enp0s3.conf.
To apply your new network settings you will need to bring the interface down and then back up again.
- Bring the interface you just updated down.
ifdown enp0s3 - Bring the interface back online.
ifup enp0s3
Verify your network settings are applied correctly. For Debian 10 and Debian 9, you can use the ip a command. For Debian 8 you would use the ifconfig command.
Setting a DHCP Address
A DHCP address is configured as shown in the example below. Unlike the the static IP address it’s a one-liner, as we do not need to set an address or gateway. These values will automatically be assigned by your network.

Applying New Network Settings
To apply your new network settings you will need to bring the interface offline and then back online.
- Bring the interface down.
ifdown enp0s3 - Bring the interface back online
ifup enp0s3
Verifying network settings in Debian 10 and Debian 11
With Debian 10 and Debian 11 you must use the ip command to view the current state of your network interfaces.
ip a2: enp0s3: <BROADCAST,MULTICAST,UP,LOWER_UP> mtu 1500 qdisc pfifo_fast state UP group default qlen 1000
link/ether 08:00:27:de:14:99 brd ff:ff:ff:ff:ff:ff
inet 10.0.0.41/24 brd 10.0.0.255 scope global dynamic enp0s3
valid_lft 562759sec preferred_lft 562759sec
inet6 2607:fea8:4de0:b900:a00:27ff:fede:1499/64 scope global dynamic mngtmpaddr
valid_lft 298sec preferred_lft 298sec
inet6 fe80::a00:27ff:fede:1499/64 scope link
valid_lft forever preferred_lft foreverIn the output of the ip a command we can see that our interface, enp0s3,
is in an UP state, has been assigned IP address 10.0.0.41/24. If you
set your IP address to 10.0.0.41/24, then your changes have been applied
successfully.
Verifying network settings in Debian 8
Network interfaces states can be check in Debian 8 using the ifconfig command.
ifconfiglo Link encap:Local Loopback
inet addr:127.0.0.1 Mask:255.0.0.0
inet6 addr: ::1/128 Scope:Host
UP LOOPBACK RUNNING MTU:16436 Metric:1
RX packets:8 errors:0 dropped:0 overruns:0 frame:0
TX packets:8 errors:0 dropped:0 overruns:0 carrier:0
collisions:0 txqueuelen:0
RX bytes:480 (480.0 b) TX bytes:480 (480.0 b)
p2p1 Link encap:Ethernet HWaddr 00:1C:C0:AE:B5:E6
inet addr:192.168.0.1 Bcast:192.168.0.255 Mask:255.255.255.0
inet6 addr: fe80::21c:c0ff:feae:b5e6/64 Scope:Link
UP BROADCAST RUNNING MULTICAST MTU:1500 Metric:1
RX packets:41620 errors:0 dropped:0 overruns:0 frame:0
TX packets:40231 errors:0 dropped:0 overruns:0 carrier:0
collisions:0 txqueuelen:1000
RX bytes:21601203 (20.6 MiB) TX bytes:6145876 (5.8 MiB)
Interrupt:21 Base address:0xe000Defining the (DNS) Nameservers
To add DNS server information, we will need to edit the /etc/resolv.conf file. Run the following command to do so:
$ nano /etc/resolv.confI am adding here two Nameservers. One is Google’s public DNS server address and the other is my router’s IP address.
nameserver 8.8.8.8 nameserver 192.168.72.2
Now press Ctrl+O and then Ctrl+X to save and exit the file.


