How to Install Nagios on Debian 11
In this guide, we are going to learn how to install Nagios on Debian 11. Nagios is an opensource tool that provides an enterprise-class central monitoring engine for IT monitoring, network monitoring, server and applications monitoring.
Some of the Nagios’ features include:.
- Monitoring of network services (via TCP port, SMTP, POP3, HTTP, NNTP, PING, etc.)
- Plugin interface to allow for user-developed service checks
- Contact notifications when problems occur and get resolved (via email, pager, or user-defined method)
- Ability to define event handlers to be run during service or host events (for proactive problem resolution)
- Web output (current status, notifications, problem history, log file, etc.)
Install Nagios on Debian 11
You can install Nagios on Debian 11 either from the source code or directly from the default Debian main repositories.
Install Nagios on Debian 11 from APT Repositories
In this guide, we will learn how to install Nagios on Debian 11 via the APT repository.
The good thing here is that, the default Debian 11 repositories provides Nagios core packages.
You can verify this by running the command below;
apt-cache policy nagios4nagios4:
Installed: (none)
Candidate: 4.4.6-4
Version table:
4.4.6-4 500
500 http://deb.debian.org/debian bullseye/main amd64 PackagesAs of this writing, the default repos provides the current stable release version of Nagios Core, which is version 4.4.6. You can check on the releases page.
Install Nagios on Debian 11
You can then simply execute the command below to install Nagios on Debian 11.
apt install nagios4Reading package lists... Done Building dependency tree... Done Reading state information... Done The following additional packages will be installed: apache2 apache2-bin apache2-data apache2-utils javascript-common libapache2-mod-php libapache2-mod-php7.4 libapr1 libaprutil1 libaprutil1-dbd-sqlite3 libaprutil1-ldap libarchive13 libcurl4 libdbi1 libgd3 libgpgme11 libjs-jquery libldb2 liblua5.3-0 libmariadb3 libnet-snmp-perl libpq5 libpython3.9 libradcli4 libsensors-config libsensors5 libsmbclient libsnmp-base libsnmp40 libsodium23 libtalloc2 libtdb1 libtevent0 liburiparser1 libwbclient0 libxpm4 mariadb-common monitoring-plugins monitoring-plugins-basic monitoring-plugins-common monitoring-plugins-standard mysql-common nagios-images nagios4-cgi nagios4-common nagios4-core php-common php7.4-cli php7.4-common php7.4-json php7.4-opcache php7.4-readline python3-gpg python3-ldb python3-samba python3-talloc python3-tdb rpcbind samba-common samba-common-bin samba-dsdb-modules samba-libs smbclient snmp ssl-cert sudo Suggested packages: apache2-doc apache2-suexec-pristine | apache2-suexec-custom www-browser php-pear lrzip libgd-tools libcrypt-des-perl libdigest-hmac-perl libio-socket-inet6-perl lm-sensors snmp-mibs-downloader icinga2 nagios-plugins-contrib fping qstat nagios-nrpe-plugin heimdal-clients python3-markdown python3-dnspython cifs-utils The following NEW packages will be installed: apache2 apache2-bin apache2-data apache2-utils javascript-common libapache2-mod-php libapache2-mod-php7.4 libapr1 libaprutil1 libaprutil1-dbd-sqlite3 libaprutil1-ldap libarchive13 libcurl4 libdbi1 libgd3 libgpgme11 libjs-jquery libldb2 liblua5.3-0 libmariadb3 libnet-snmp-perl libpq5 libpython3.9 libradcli4 libsensors-config libsensors5 libsmbclient libsnmp-base libsnmp40 libsodium23 libtalloc2 libtdb1 libtevent0 liburiparser1 libwbclient0 libxpm4 mariadb-common monitoring-plugins monitoring-plugins-basic monitoring-plugins-common monitoring-plugins-standard mysql-common nagios-images nagios4 nagios4-cgi nagios4-common nagios4-core php-common php7.4-cli php7.4-common php7.4-json php7.4-opcache php7.4-readline python3-gpg python3-ldb python3-samba python3-talloc python3-tdb rpcbind samba-common samba-common-bin samba-dsdb-modules samba-libs smbclient snmp ssl-cert sudo 0 upgraded, 67 newly installed, 0 to remove and 0 not upgraded. Need to get 33.7 MB of archives. After this operation, 131 MB of additional disk space will be used. Do you want to continue? [Y/n] y
Nagios User and Group
The installation command creates dedicated Nagios user and group;
getent passwd nagios
nagios:x:109:115::/var/lib/nagios:/usr/sbin/nologingetent group nagiosnagios:x:115:Nagios Service
The install command creates Nagios service configuration files;
systemctl status nagios4● nagios4.service - nagios4
Loaded: loaded (/lib/systemd/system/nagios4.service; disabled; vendor preset: enabled)
Active: active (running) since Fri 2021-08-27 07:47:28 EAT; 8min ago
Docs: man:nagios4
Main PID: 17993 (nagios4)
Tasks: 6 (limit: 2341)
Memory: 20.2M
CPU: 296ms
CGroup: /system.slice/nagios4.service
├─17993 /usr/sbin/nagios4 /etc/nagios4/nagios.cfg
├─17994 /usr/sbin/nagios4 --worker /var/lib/nagios4/rw/nagios.qh
├─17995 /usr/sbin/nagios4 --worker /var/lib/nagios4/rw/nagios.qh
├─17996 /usr/sbin/nagios4 --worker /var/lib/nagios4/rw/nagios.qh
├─17997 /usr/sbin/nagios4 --worker /var/lib/nagios4/rw/nagios.qh
└─17998 /usr/sbin/nagios4 /etc/nagios4/nagios.cfg
Aug 27 07:47:28 debian11 nagios4[17993]: wproc: Registry request: name=Core Worker 17994;pid=17994
Aug 27 07:47:28 debian11 nagios4[17993]: wproc: Registry request: name=Core Worker 17994;pid=17994
Aug 27 07:47:28 debian11 nagios4[17993]: wproc: Registry request: name=Core Worker 17997;pid=17997
Aug 27 07:47:28 debian11 nagios4[17993]: wproc: Registry request: name=Core Worker 17997;pid=17997
Aug 27 07:47:28 debian11 nagios4[17993]: wproc: Registry request: name=Core Worker 17996;pid=17996
Aug 27 07:47:28 debian11 nagios4[17993]: wproc: Registry request: name=Core Worker 17996;pid=17996
Aug 27 07:47:28 debian11 nagios4[17993]: wproc: Registry request: name=Core Worker 17995;pid=17995
Aug 27 07:47:28 debian11 nagios4[17993]: wproc: Registry request: name=Core Worker 17995;pid=17995
Aug 27 07:47:29 debian11 nagios4[17993]: Successfully launched command file worker with pid 17998
Aug 27 07:47:29 debian11 nagios4[17993]: Successfully launched command file worker with pid 17998
Enable the service to run on system boot.
systemctl enable nagios4
Nagios Configuration Files
The Nagios configuration files are installed under, /etc/nagios4/.
ls -1d /etc/nagios4/*/etc/nagios4/apache2.conf
/etc/nagios4/cgi.cfg
/etc/nagios4/conf.d
/etc/nagios4/htdigest.users
/etc/nagios4/nagios.cfg
/etc/nagios4/objects
/etc/nagios4/resource.cfg
/etc/nagios4/stylesheetsNagios Apache Config files
Apache configuration files for Nagios web interface, is also setup on the /etc/apache2/conf-available/nagios4-cgi.conf configuration file.
The sample configuration file without comment lines is shown below;
ScriptAlias /cgi-bin/nagios4 /usr/lib/cgi-bin/nagios4
ScriptAlias /nagios4/cgi-bin /usr/lib/cgi-bin/nagios4

Alias /nagios4/stylesheets /etc/nagios4/stylesheets

Alias /nagios4 /usr/share/nagios4/htdocs

<DirectoryMatch (/usr/share/nagios4/htdocs|/usr/lib/cgi-bin/nagios4|/etc/nagios4/stylesheets)>
    Options FollowSymLinks
    DirectoryIndex index.php index.html
    AllowOverride AuthConfig
    Require ip	::1/128 fc00::/7 fe80::/10 10.0.0.0/8 127.0.0.0/8 169.254.0.0/16 172.16.0.0/12 192.168.0.0/16
    <Files "cmd.cgi">
	AuthDigestDomain "Nagios4"
	AuthDigestProvider file
	AuthUserFile	"/etc/nagios4/htdigest.users"
	AuthGroupFile	"/etc/group"
	AuthName	"Nagios4"
	AuthType	Digest
	Require all	granted
    </Files>
</DirectoryMatch>

<Directory /usr/share/nagios4/htdocs>
    Options	+ExecCGI
</Directory>
Update Default Configuration
You can adjust the configuration file as you so wish.
For example, run the commands below to update the default configuration file.
cp /etc/apache2/conf-enabled/nagios4-cgi.conf{,.original}cat > /etc/apache2/conf-enabled/nagios4-cgi.conf << EOL
ScriptAlias /cgi-bin/nagios4 /usr/lib/cgi-bin/nagios4
ScriptAlias /nagios4/cgi-bin /usr/lib/cgi-bin/nagios4
Alias /nagios4/stylesheets /etc/nagios4/stylesheets
Alias /nagios4 /usr/share/nagios4/htdocs
<DirectoryMatch (/usr/share/nagios4/htdocs|/usr/lib/cgi-bin/nagios4|/etc/nagios4/stylesheets)>
Options FollowSymLinks
DirectoryIndex index.php index.html
AllowOverride AuthConfig
AuthDigestDomain "nagios4"
AuthDigestProvider file
AuthUserFile "/etc/nagios4/htdigest.users"
AuthGroupFile "/etc/group"
AuthName "Restricted Nagios4 Access"
AuthType Digest
Require valid-user
</DirectoryMatch>
<Directory /usr/share/nagios4/htdocs>
Options +ExecCGI
</Directory>
EOL
Enable Apache rewrite and CGI modules
You need to enable Apache rewrite and CGI modules.
a2enmod rewrite cgi
Setup Nagios Apache Authentication
Enable Required Modules
If you can check the configuration above, Nagios by default uses MD5 digest authentication. As such you need to enable the required module. Run the command below to check if the modules are already enabled;
apachectl -M | grep -iE 'digest|group' auth_digest_module (shared)
authz_groupfile_module (shared)If not enabled, run the command below to enable;
a2enmod auth_digest authz_groupfileCreate Nagios Authentication Users
To setup Nagios Web authentication, you need to create an Apache user for authentication.
Since it is using MD5 digest, then this can be done using the htfigest command.
The syntax for the command is;
htdigest [ -c ] passwdfile realm usernameThe auth passwdfile is defined in the configuration above as /etc/nagios4/htdigest.users.
htdigest -c /etc/nagios4/htdigest.users "Restricted Nagios4 Access" nagiosadminThe user, nagiosadmin, is used by default and is defined in the/etc/nagios4/cgi.cfg config file.
If you need to use a different user, you need to replace all the occurrences of nagiosadmin on the /etc/nagios4/cgi.cfg file with the user you created.
For example, if you use like admin, replace nagiosadmin as shown below.
sed -i 's/nagiosadmin/admin/g' /etc/nagios4/cgi.cfgIf you also want to use a different authentication user file instead of, /etc/nagios4/htdigest.users, ensure you edit the Nagios Apache configuration file, /etc/apache2/conf-available/nagios4-cgi.conf and change the value of AuthUserFile.
And of course, you can then generate the password for that user.
Start Apache Web server
Once you are done with configuration, restart Apache.
systemctl restart apache2To check the status;
systemctl status apache2If any firewall is running on your system, be sure to enable Apache through it.
ufw allow 80/tcpRestart Nagios service
Restart Nagios service by running the command below;
systemctl restart nagios4To check the status
systemctl status nagios4If you need to go through the Nagios logs, the log file is;
/var/log/nagios4/nagios.logAccessing Nagios Web UI on Debian 11
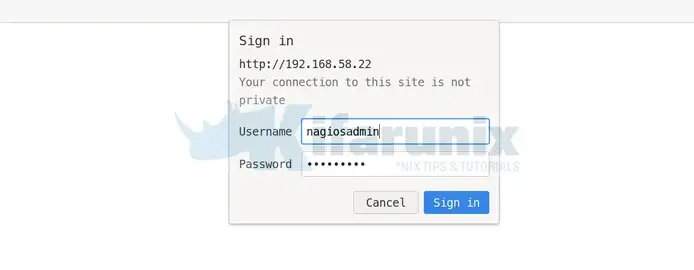
Once you are done with the configuration, navigate to the browser and access your Nagios with the address http://<server-IP>/nagios4.
You will be prompted to enter username and password created above to login.
Nagios uses various plugins located under /usr/lib/nagios/plugins/ to monitor various services.
ls -1 /usr/lib/nagios/plugins/*/usr/lib/nagios/plugins/check_apt /usr/lib/nagios/plugins/check_breeze /usr/lib/nagios/plugins/check_by_ssh /usr/lib/nagios/plugins/check_clamd /usr/lib/nagios/plugins/check_cluster /usr/lib/nagios/plugins/check_curl /usr/lib/nagios/plugins/check_dbi /usr/lib/nagios/plugins/check_dhcp /usr/lib/nagios/plugins/check_dig /usr/lib/nagios/plugins/check_disk /usr/lib/nagios/plugins/check_disk_smb /usr/lib/nagios/plugins/check_dns /usr/lib/nagios/plugins/check_dummy /usr/lib/nagios/plugins/check_file_age /usr/lib/nagios/plugins/check_flexlm /usr/lib/nagios/plugins/check_fping /usr/lib/nagios/plugins/check_ftp /usr/lib/nagios/plugins/check_game /usr/lib/nagios/plugins/check_host /usr/lib/nagios/plugins/check_hpjd /usr/lib/nagios/plugins/check_http /usr/lib/nagios/plugins/check_icmp /usr/lib/nagios/plugins/check_ide_smart /usr/lib/nagios/plugins/check_ifoperstatus /usr/lib/nagios/plugins/check_ifstatus /usr/lib/nagios/plugins/check_imap /usr/lib/nagios/plugins/check_ircd /usr/lib/nagios/plugins/check_jabber /usr/lib/nagios/plugins/check_ldap /usr/lib/nagios/plugins/check_ldaps /usr/lib/nagios/plugins/check_load /usr/lib/nagios/plugins/check_log /usr/lib/nagios/plugins/check_mailq /usr/lib/nagios/plugins/check_mrtg /usr/lib/nagios/plugins/check_mrtgtraf /usr/lib/nagios/plugins/check_mysql /usr/lib/nagios/plugins/check_mysql_query /usr/lib/nagios/plugins/check_nagios /usr/lib/nagios/plugins/check_nntp /usr/lib/nagios/plugins/check_nntps /usr/lib/nagios/plugins/check_nt /usr/lib/nagios/plugins/check_ntp /usr/lib/nagios/plugins/check_ntp_peer /usr/lib/nagios/plugins/check_ntp_time /usr/lib/nagios/plugins/check_nwstat /usr/lib/nagios/plugins/check_oracle /usr/lib/nagios/plugins/check_overcr /usr/lib/nagios/plugins/check_pgsql /usr/lib/nagios/plugins/check_ping /usr/lib/nagios/plugins/check_pop /usr/lib/nagios/plugins/check_procs /usr/lib/nagios/plugins/check_radius /usr/lib/nagios/plugins/check_real /usr/lib/nagios/plugins/check_rpc /usr/lib/nagios/plugins/check_rta_multi /usr/lib/nagios/plugins/check_sensors /usr/lib/nagios/plugins/check_simap /usr/lib/nagios/plugins/check_smtp /usr/lib/nagios/plugins/check_snmp /usr/lib/nagios/plugins/check_spop /usr/lib/nagios/plugins/check_ssh /usr/lib/nagios/plugins/check_ssmtp /usr/lib/nagios/plugins/check_swap /usr/lib/nagios/plugins/check_tcp /usr/lib/nagios/plugins/check_time /usr/lib/nagios/plugins/check_udp /usr/lib/nagios/plugins/check_ups /usr/lib/nagios/plugins/check_users /usr/lib/nagios/plugins/check_wave /usr/lib/nagios/plugins/negate /usr/lib/nagios/plugins/urlize /usr/lib/nagios/plugins/utils.pm /usr/lib/nagios/plugins/utils.sh
Host Status
Host Services Status
There you go. You have successfully install and configured Nagios on Debian 11.
Other Tutorials
If you need to monitor you Linux/Windows Hosts or any other device, see out links below;


