How To Uninstall and Reinstall Microsoft Edge
Need to fix a terminal issue with Microsoft Edge? Want to remove and reinstall? Microsoft Edge won’t start or playing up? This tutorial will walk you through uninstalling and reinstalling Microsoft’s flagship browser.
When Microsoft Edge first came out it was something of a disappointment. It wouldn’t work with extensions, tabbed browsing was problematic, it seemed to have trouble importing bookmarks and just didn’t live up to the hype. Two years on and Edge has changed dramatically. It is now built with Chromium instead of Microsoft’s proprietary software, works with extensions, is stable, offers half decent security and isn’t bad at all.
I would still suggest using Brave, Firefox or Chrome but if you like the look and feel of Microsoft Edge, using it isn’t the compromise it once was.
Unless it’s playing up of course.
Uninstall Microsoft Edge from Windows 10
Uninstalling a program should really be the last resort but if you have gotten to that point already, uninstalling it may be your only option. I know of a few problems that stop you being able to use Edge such as it not starting, or starting and then immediately shutting down or even flagging your antivirus every time it starts.
There may be workarounds for these issues, but removing the browser, wiping all traces of it and then downloading a fresh copy can right all those wrongs.
As Microsoft Edge is built into Windows 10, it isn’t straightforward to remove it, but you can do it. You will need to use Windows PowerShell to do it but if you follow these instructions exactly you should be fine.
- Back up any bookmarks you have in Edge that you don’t have elsewhere.
- Type ‘power’ into the Windows Search box and select Windows PowerShell (x86).
- Type ‘get-appxpackage *edge*’ into the Power Shell window and hit Enter.
- Identify the PackageFullName entry and copy the entire line after the ‘:’.
- Type ‘remove-appxpackage’ and paste the entry from above.
- Hit Enter.
The line should read ‘remove-appxpackage
Microsoft.MicrosoftEdge_44.17763.1.0_neutral__8wekyb3d8bbwe’ or something very similar. This is where the Edge app is installed. The removal process will remove the installer files and remove Edge completely from your Windows 10 computer.
Next, use a system cleaner such as CCleaner to remove registry entries and any orphaned files. While the package removal above will remove Edge from your computer, it does leave stuff behind. If you’re trying to fix an issue with Edge, you don’t want any new installation using potentially corrupted files.
Finally, check C:\Windows\SystemApps for the Microsoft.MicrosoftEdge_8wekyb3d8bbwe folder and delete it.
Reinstall Microsoft Edge on Windows 10
You will be pleased to know that reinstalling Microsoft Edge is a lot easier than removing it. All you need to do is start it from the Windows Start menu, wait for it to shut itself down, give if a few seconds and then start it again. This should cause the Windows Store to reinstall Edge onto your computer and prepare it for use.
The second time you start Edge, it should load as normal. You will need to import any bookmarks again but the browser should work fine.
If that doesn’t work, you can manually install Edge using the app package installer in a similar way to how you removed it.
- Type ‘power’ into the Windows Search box, right click Windows PowerShell (x86) and select Open as Administrator.
- Paste the following ‘Get-AppXPackage -Name Microsoft.MicrosoftEdge | ForEach {Add-AppxPackage -DisableDevelopmentMode -Register “$($_.InstallLocation)\AppXManifest.xml”}’ and hit Enter.
- Try to launch Edge from the Windows Start menu.
When you hit Enter in PowerShell you should see some lines go across the screen. This is normal and is a progress meter that illustrates your command has been executed and completed. Once finished, the cursor should return to its default. Launch Microsoft Edge as normal and it should work perfectly.
Reset Microsoft Edge
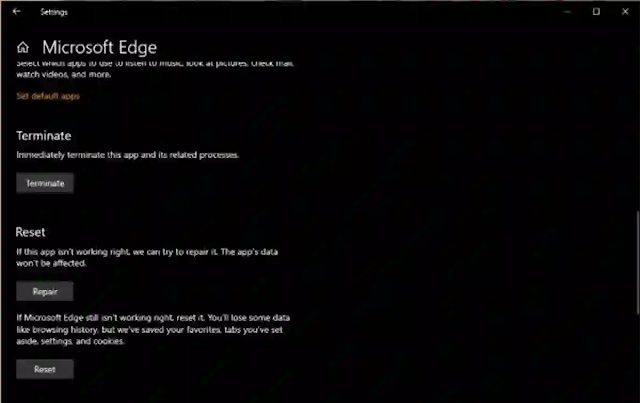
Rather than uninstalling and reinstalling Microsoft Edge, it might be quicker to just reset it. This is like a factory reset on a device, it removes all configurations and customizations and reverts everything back to default. It is fast than reinstalling it and takes just a few seconds.
- Right click the Windows Start button and select Settings.
- Select Apps & Features and scroll to Microsoft Edge.
- Select Advanced Settings.
- Scroll to Reset and select it.
You will notice that the Uninstall option is grayed out and not selectable like in other apps. That’s why we had to use PowerShell to remove it earlier. There is also a Repair option above Reset but I haven’t had much success with it so far. You’re welcome to try it if you want to as you might have better luck!


