How To Configure A Static Network IP Address On Linux
By default, upon installation, any Linux system uses DHCP for its network configuration. This implies that it automatically obtains an IP address from a router or a DHCP server in a network. However, there are certain instances that require configuration of a static IP. A good example is where you have a server, e.g a web server or an FTP server. You definitely don’t want its IP to keep changing once the DHCP lease time is over. This will definitely cause loss of service once the IP changes.
Let’s see how we can configure a static IP in different distros.
Configuring a static IP in Fedora 27, CentOS and RHEL 7
Firstly, list the IP of all interfaces
ifconfig -a
Sample Output
[root@localhost ~]# ifconfig -a
enp0s3: flags=4163<UP,BROADCAST,RUNNING,MULTICAST> mtu 1500
inet 192.168.43.160 netmask 255.255.255.0 broadcast 192.168.43.255
inet6 fe80::fc3c:1bfc:d5c7:9bd8 prefixlen 64 scopeid 0x20
ether 08:00:27:1d:2a:e1 txqueuelen 1000 (Ethernet)
RX packets 1828 bytes 145269 (141.8 KiB)
RX errors 0 dropped 0 overruns 0 frame 0
TX packets 477 bytes 78999 (77.1 KiB)
TX errors 0 dropped 0 overruns 0 carrier 0 collisions 0

lo: flags=73<UP,LOOPBACK,RUNNING> mtu 65536
inet 127.0.0.1 netmask 255.0.0.0
inet6 ::1 prefixlen 128 scopeid 0x10
loop txqueuelen 1000 (Local Loopback)
RX packets 0 bytes 0 (0.0 B)
RX errors 0 dropped 0 overruns 0 frame 0
TX packets 0 bytes 0 (0.0 B)
TX errors 0 dropped 0 overruns 0 carrier 0 collisions 0
Above, we can observe that our IP address is 192.168.43.160 and netmask is 255.255.255.0 We are going to configure this statically.
Navigate to the following path to view interface statistics of interface enp0s3
vi /etc/sysconfig/network-scripts/ifcfg-enp0s3
The sample output should contain the following parameters:
NETWORKING=yes
This tells the system to start networking service at boot time.
DEVICE=eth0
BOOTPROTO=dhcp
ONBOOT=yes
To set a static IP, modify the following settings:
HWADDR=08:00:27:1d:2a:e1
TYPE=Ethernet
BOOTPROTO=none
# Server IP #
IPADDR=192.168.43.160
# Subnet #
NETMASK=255.255.255.0
# Set default gateway IP #
GATEWAY=192.168.43.1
# Set dns servers #
DNS1=192.168.43.1
DNS2=8.8.8.8
DEFROUTE=yes
IPV4_FAILURE_FATAL=no
# Disable ipv6 #
IPV6INIT=no
NAME=enp0s3
UUID=41171a6f-bce1-44de-8a6e-cf5e782f8bd6
DEVICE=eth0
ONBOOT=yes
Restart the networking service
systemctl restart network
Verify the settings.
ifconfig
Also, check the nameservers
cat /etc/resolv.conf
Output
# Generated by NetworkManager
nameserver 192.168.43.1
nameserver 8.8.8.8
using nmtui utility
nmtui, short for Network Manager Text User interface is a GUI tool that painlessly allows you to configure your network interface without having to touch the command line. It can be installed both on RPM and Debian based distributions.
For Centos & RHEL 7
yum install NetworkManager-tui
dnf install NetworkManager-tui For Fedora 21 and later
Launching nmtui
nmtui
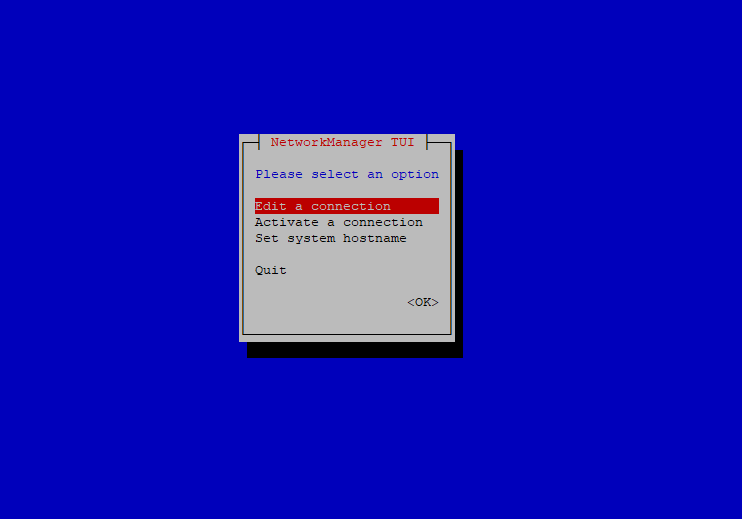
Select an interface to configure

Press ‘Tab’ key to navigate to the other options. Hit edit.
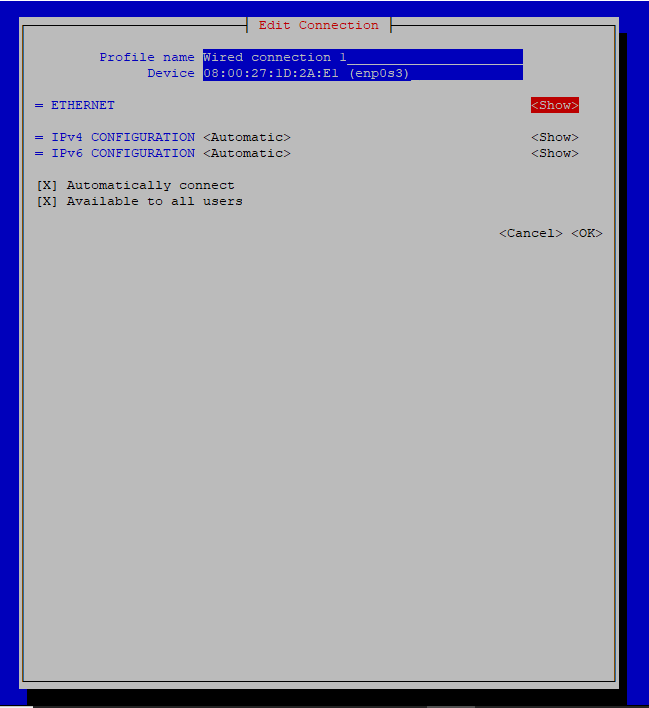
Navigate to IPV4 and select ‘show’
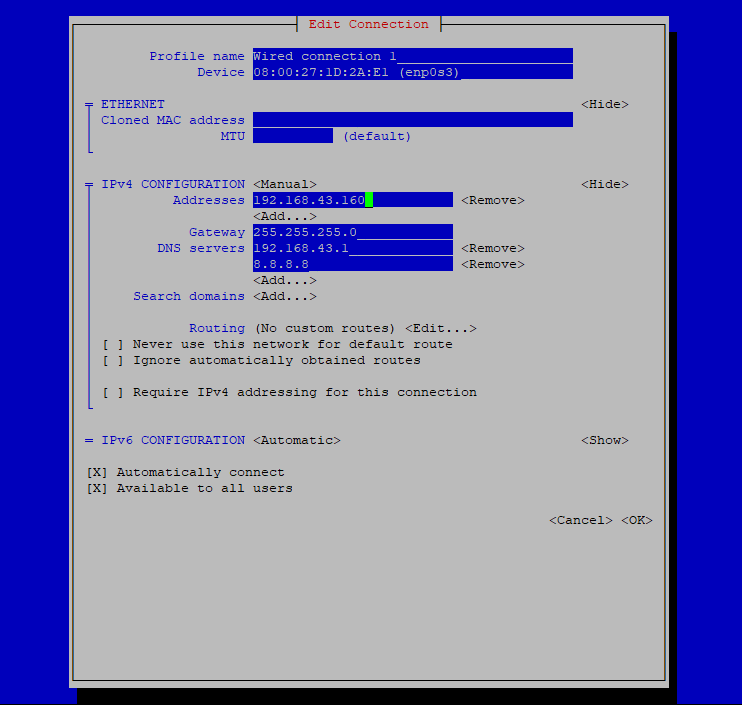
Hit Okay. Go back and select Quit
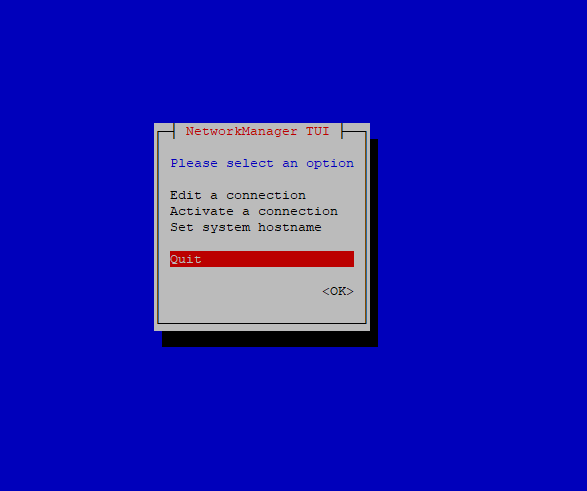
Finally, restart networking service.
Configuring a static IP in Ubuntu 14.04, 16.04
Navigate to the network interface configuration file
nano /etc/sysconfig/interfaces
DHCP settings
auto eth0
iface eth0 inet dhcp
To configure a static IP, remove DHCP and append ‘static’ to ‘inet’ and enter your preferred address, netmask, gateway and dns-name servers
auto eth0
iface eth0 inet static
address 192.168.43.17
netmask 255.255.255.0
gateway 192.168.43.1
dns-nameservers 192.168.43.1 8.8.8.8
Restart networking
ifdown eth0
ifup eth0
Verify the settings using ifconfig command and cat /etc/resolv.conf
Wrapping up
Your thoughts about this article are highly welcome. Feel free to get back to us for any clarifications.

