How to open Webp Files in Photoshop | Download [Windows] [Mac]
Do you have the problem in opening Webp Files (.webp) in your adobe photoshop or another image viewer? By following the below method you can solve this issue.
You can use this tips in versions Adobe Photoshop 7.0, CS2, CS3, CS4, CS5 and CS6. If you want to rectify this issue in your windows, then download .webp plugin for windows.
Step 1: Download .webp plugin for the window.
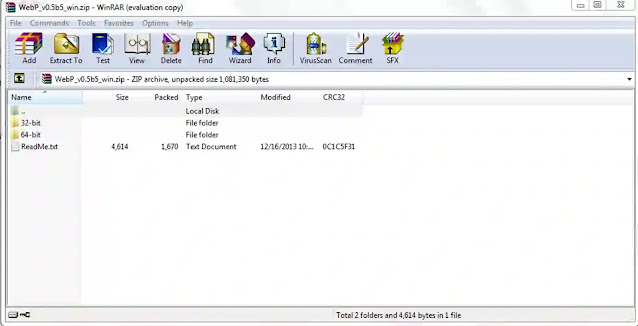
Step 2: Now unzip downloaded zip record then you'll get a folder in the call of ‘WebP_v0.5b5_win ‘which having folders for Windows 32 and Windows 64 bit.
What is webp format?
Webp is image format that developed by Google. If the image size is big then it takes a long time to load but webp is an image layout that facilitates to reduce the image size. So it takes only less time to load the image in the internet page with the help of lossless and lossy compression method. But still, maximum of the software such as windows, mac or any other image editor isn't supporting to this format. Come let us repair this issue with a plugin(.webp).Fix for Windows Operating System:
Step 3: Choose your optional folder according to your Windows bit. Whether it is 32 or 64.
Step 4: Find the record ‘WebP’ in the folder. Copy and paste the folder in the Adobe Photoshop directory where it gets installed (C:Program FilesAdobeAdobe Photoshop CS6 (64 Bit) Plug-ins).
Step 5: Now you can test with the webp file format in Photoshop User Interface. It will work.
If you want webp to support for Mac OS, then follow the steps below.
Step 1: Download .webp plugin for Mac.
Step 2: Step 2: Now unzip downloaded zip file then you will get a folder in the call of ‘WebP_v0.5b5_mac ‘
Step 3: Look for the file ‘Webp’ in the folder. Copy and paste the folder in the Photoshop folder.
"Note: To find the folder location of Mac OS X Photoshop ,
Go to Application folder
Select Adobe photoshop
While right click above it you will get an option ‘Show Package Contents’.
In that select Contents-> Plugin-> Paste Webp
Fix for MAC Operating System:
Hope you get an idea now. Do you have any more doubts then leave your doubts below. We will solve it.


